
Have you ever heard someone talk about “donor segmentation” and been too afraid to ask what it is? You’re in the right place!
Simply put, donor segmentation is the process of dividing your audience into smaller groups based on shared characteristics.
It’s a simple concept, but it can have a big impact! It’s one of the most powerful ways to connect with your supporters.
Segmentation enables you to send messages that feel personal, even if you’re communicating with hundreds or thousands of people at once. And that is powerful because, when people feel like you’re speaking directly to them, they’re more likely to engage with you.
At the end of this article, you’ll find a donor segmentation cheat sheet. And, between here and there, we’ll break down what segmentation is, why it matters, and how to start using it in your own communications.

Why Donor Segmentation Works
Donor segmentation can be intimidating (that’s why we put together the donor segmentation cheat sheet—even we can get overwhelmed sometimes). But the work is worth the effort!
There are three main reasons donor segmentation is such an effective strategy.
1. Donor segmentation deepens connections
People support you because they care about your cause. When you use donor segmentation, you can acknowledge that commitment in a specific, personal way.
2. It helps you cut through the noise
You’re competing for attention in an increasingly noisy world! Segmentation helps you stand out. According to Campaign Monitor, personalized email campaigns can result in a 760% increase in revenue. When you have good lists, you can give people the kind of personalization they want.
3. It improves results across the board.
Segmented outreach makes your appeals, event promotions, impact updates, membership drives, and volunteer recruitment efforts more effective. When people feel like your messaging is personal and relevant, they’ll be more likely to read (and act upon) what you have to say.
You can do a lot of this regardless of what you’re using for your email service or to manage your donor database. But it’s way easier if you’re using a comprehensive donor management platform… especially if the system already includes email communication tools.

New to Donor Segmentation? Start Simple!
Even if you don’t realize it, you’ve probably already used segmentation at least once. If you’ve ever invited a past event attendee to come back to this year’s event or skipped sending a volunteer recruitment email to your active volunteers, you’ve used segmentation!
There are virtually endless possibilities for segmenting your audience. If you’re just getting started, though, we suggest keeping it pretty simple. Some good segments to consider using are things like:
- Donors and potential donors
- Lapsed donors
- Recurring and one-time donors
- Members and non-members
- Volunteers
- Event participants
- People who have supported specific campaigns
Each of these groups has a different relationship with your organization. When you send an appeal to someone who’s never given before, you’ll probably want to address them a little differently than you would someone who’s supported you in the past. If you’re inviting someone to attend an event, you may want to send a special version of your invitation to people who have attended in the past.
When you get comfortable with some more simple segmentation practices, you can start getting really creative with the groups you build. You could try, for example, creating segments like:
- Donors who are also active volunteers
- Members who are also donors
- People who have attended events but have never donated
The more granular you get, the more personalized you can be in your messaging. If you’ve got the right audiences, this can have a huge impact! The Pacific Opera Project, for example, created a segment of people who had attended multiple events but had never made a gift. The results were pretty outstanding—you can read all about it here!

By identifying these segments and speaking to each group in a way that’s relevant to them, you’re creating a personalized experience—something we’ve all come to expect in a world of tailored ads, algorithm-driven social feeds, and customized shopping suggestions.
Getting Started With Segmentation
Okay, this all sounds great. But how do you actually use segmentation to send really personal communications to your different groups of supporters?
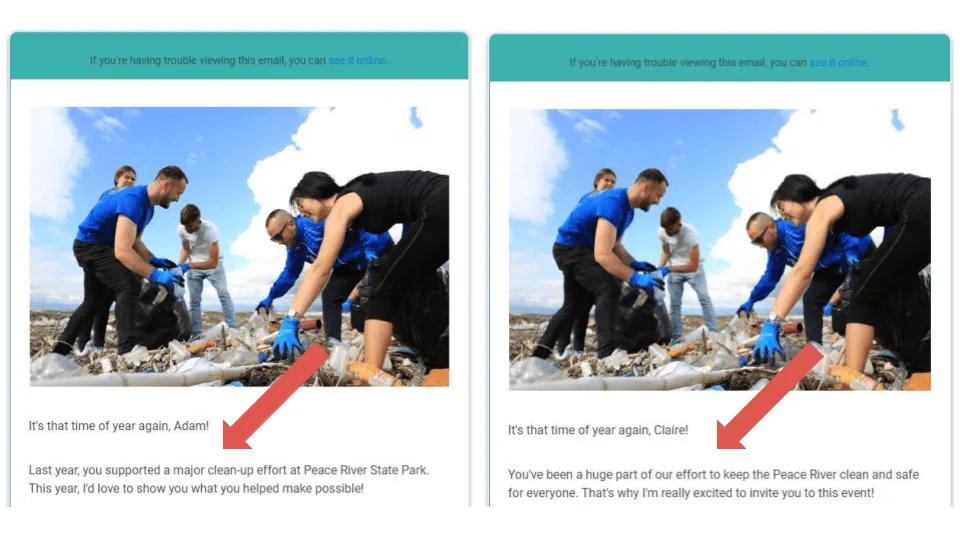
Here’s a simple process you can follow. For this purpose, let’s imagine you’re sending information about an upcoming river clean-up campaign.
Step 1: Decide who you’re talking to
Who are you going to address in your email? This is the first thing you’ll want to establish!
We’re going to address people who donated to this campaign last year, and we’re going to send a slightly different version to someone who volunteered last year.
You’re going to run two reports. One will include people who donated to last year’s campaign, and one will include people who volunteered at last year’s clean-up. We’ll check for people who appear on both lists and remove them from one of the two (which is up to you!). Then we’ll take our finished lists and use them as mailing lists for our email.
Step 2: Tailor your communications
Start with your base appeal, then create different iterations based on the segments you’ve decided to address. When you do this, you save yourself a ton of work! Instead of multiple versions of an email, you can just adjust a few lines to make your message feel personal.
Step 3: Don’t forget exclusion lists
Segmentation only works if you’re emailing people who want to hear from you or who don’t need to hear from you again. In this case, for example, we may want to avoid sending this volunteer invitation to people who have already signed up to volunteer.
In that case, we’d run a report of everyone who’s already signed up for the clean-up day this year. Then we’d upload that list as an exclusion list in our email system.
Step 4: Expand as you grow
Once you’re comfortable with the basics, you can get more granular! Next year, for example, we could send additional versions of this invitation. We might send a slightly different version to people who both volunteered and donated (since we only sent them one or the other this year), or we could send a modified version for people who have donated before but not to this specific campaign.
The possibilities are endless!
The Technical Side: Lists and Automation
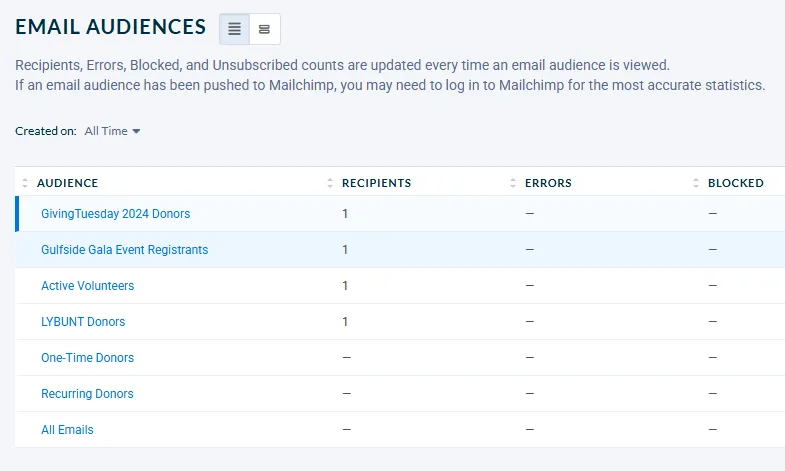
At its simplest, segmentation can be done by running a report and creating a list—that’s how we did things in our example.
Another good example could be how you segment your appeal for a GivingTuesday campaign. If you wanted to send a special “look what you made possible” message to past GivingTuesday donors before inviting them to give again this year, you can do that with reports. Your send list would simply be the list of people from a report of people who donated on GivingTuesday last year. Then you’d use the same list to exclude those people from receiving the more general GivingTuesday appeal.
If your database allows it, you can automate this process. This is done by creating dynamic lists (we call them Live Reports in Neon CRM) that update automatically as supporter activity changes.
That way, your communications are always going to the right people without requiring constant manual updates.

Start Experimenting with Donor Segmentation!
Not sure where to begin?
Start by identifying two or three meaningful segments in your supporter base, then tailor your communications accordingly. As you get more comfortable, you can build out more detailed groups and even automate the process.
The goal isn’t to create more work for yourself. The goal is simply to make sure every message you send feels like it was written with the recipient in mind. When your supporters feel seen and valued, they’ll be more likely to stay engaged!
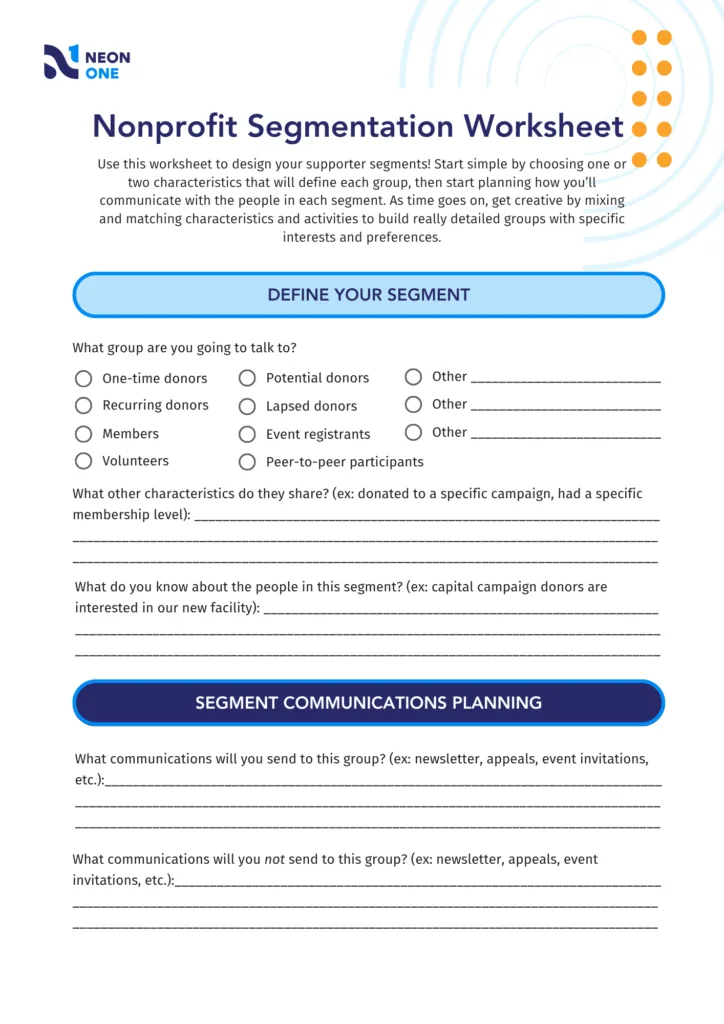
Snag Your Donor Segmentation Cheat Sheet
If you want some help staying organized, use this sheet to plan the different segments you’ll address during your next email send. It will walk you through identifying your key groups and their shared characteristics, deciding how you’ll talk to them, and making a note about what you won’t send to them.
Keep it handy while you create your next campaign—pretty soon, you won’t need it at all!