
Knowing how to set up an online donation form is an increasingly important part of fundraising. In 2024, more than 13% of all charitable donations happened online. And that percentage goes up every year!
But, while many donors prefer to give online, they’re easily dissuaded by long, clunky donation forms. Donating to your organization should be quick and easy—but where do you start?
Read on to learn how to set up a donation form in seven steps.
Step One: Choose Your Provider
Unless you’ve got the time and skill set to build a custom donation form and manage a merchant processor relationship, you’ll need to use an online fundraising platform. Typically, an online fundraising platform will come with a built-in merchant processor and tools you can use to quickly create donation forms.
Look for a provider that makes it very easy for you and your team to create and update donation forms. Ideally, the solution you choose will also include the ability to create multiple donation forms for use across different campaigns.
You’ll also want to look for tools that make it easy for you to customize your donation page (where the form is hosted) or build a donation form you can embed on an existing page on your nonprofit’s website.
Step Two: Design Your Form
It’s important that your online fundraising tool gives you the ability to design beautiful donation forms. A well-designed form can reinforce someone’s decision to give. Make your donor feel good about their gift and make sure the donation process is an enjoyable one. Those positive feelings will help you retain this donor down the line!
Make Donors Feel Good About Giving
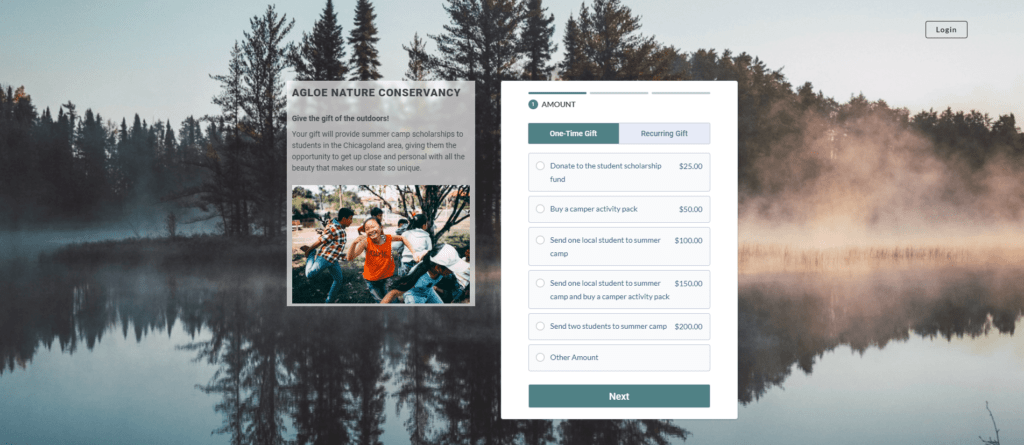
When you design your donation form, try to include some storytelling elements that connect donors to the people they’re helping. You want to reiterate the positive outcomes they’ll make possible with their gift. Adding an image to your donation form will help! Look for a people-centric image related to your mission for the best results.
Ideally, the image you choose will help your donor understand who their gift may help. If your organization is an animal shelter, you could choose an image of a person with their newly adopted pet. A food pantry could add a picture of one of your volunteers helping someone fill up a shopping cart. This is even more effective if your picture is accompanied by a short impact statement reiterating how your donor’s gift will make a tangible difference in someone’s life.
Remove Distractions From Your Donation Form
Whether you’re building a donation page directly in your online fundraising platform or embedding a form on a preexisting page, you’ll want to remove any page elements—like content widgets, videos, and even your navigation menu—that might distract someone from completing their gift.
Resist the temptation to add links to other types of gifts, too. If someone has landed on your donation form and wants to make a gift, don’t distract them. Find a different place on your site to include links to your Amazon wish list or links to different campaigns.
It’s also important not to make additional asks on your donation form. Don’t invite people to watch update videos, sign up for your newsletter, or look at your upcoming events. You can always add other calls to action on your donation confirmation page, receipt, or thank-you letters.

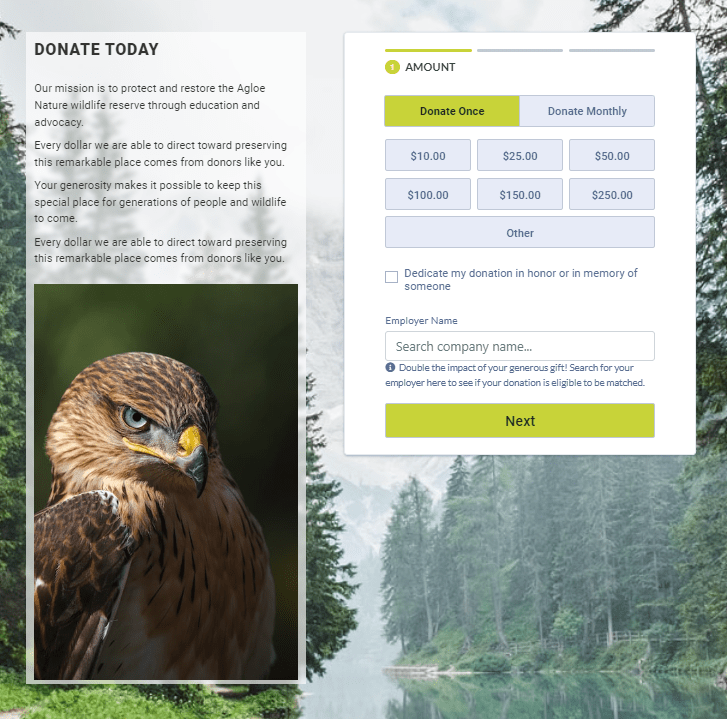
Step Three: Add Suggested Donation Amounts to Your Donation Form
Have you ever gone to the grocery store and been overwhelmed by the number of choices you have? That’s called “decision paralysis.” People are frequently overwhelmed when they have too many options. When someone lands on your donation form, they may be unsure how much they want to give. Choosing an amount can feel overwhelming!
That’s why adding suggested donation amounts can help improve your donor’s experience.
Try setting up suggested donation amounts that will help someone decide how much they want to give. You could provide options for $25, $50, $75, and $100, or you could customize your suggested amounts based on how much your donors tend to give. If your average online donor gives $45, for example, you could start your suggested amounts at $50 instead of $25.

Suggested donation amounts are even more effective if you can include impact statements that help donors understand what those different amounts will achieve. Seeing a $25 suggested gift amount is great. Seeing a $25 suggested gift amount that will pay for one therapy appointment at your walk-in clinic is even better.
Whatever you choose to do, make sure you always include the option for someone to choose their own gift amount. A donor who lands on your donation form intending to give $20 may choose to give $25 if given the option. But if that donor still only wants to donate $20, they should be able to do so!
Step Four: Enable Recurring Donations
Recurring donors are some of the most valuable supporters in your donor base. They’re easier to retain than one-time donors, and they tend to give more over their relationship with your organization. A one-time donor’s $100 gift may seem more significant than a $25 recurring donation, but a monthly gift of $25 adds up quickly!
Give your donors the opportunity to make this kind of gift. You may want to consider offering a handful of frequency options. Don’t get carried away—that decision paralysis is a real thing—but you might want to try offering a few choices. Monthly recurring gifts are the most common, but you may want to consider adding bi-weekly, quarterly, or annual options.
When you’re building your recurring giving options, remember not to make them the default. If someone lands on your form intending to make a one-time gift, you don’t want them to feel like you’re trying to trick them into making a monthly gift. The exception to this rule is if your donation form was made exclusively for an appeal for recurring gifts!
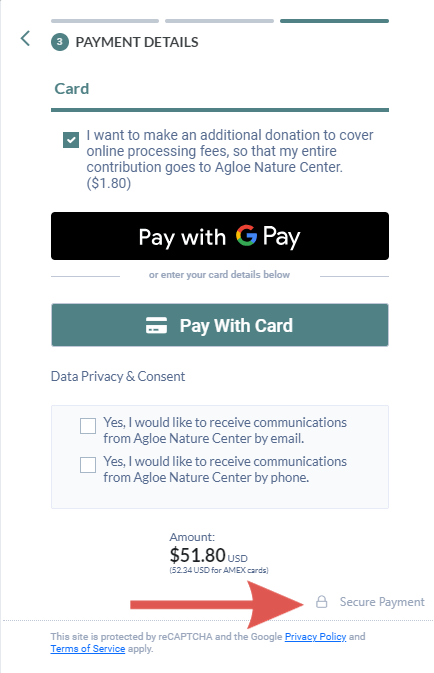
Step Five: Make Your Donors Feel Safe
Eight out of ten American citizens are concerned about online security (psst: We covered this in Donors: Understanding The Future of Individual Giving). If you want people to feel comfortable giving you sensitive information, like their contact information and payment details, you’ll need to signal to them that your donation form is safe.
One of the best ways to do this is to make sure your donation form is encrypted. This is easy to do: Simply navigate to your donation form and look for “https” at the beginning of the URL. If you see that prefix, congratulations! You’ve got an encrypted page. If you don’t see that prefix, talk to your web administrator about getting the proper security certificates in place.
Another simple way to make your donors feel safe is to include a lock icon near the end of your donation form. This is a subtle security indicator, but it works! Your online fundraising platform may already have this included on its forms. If they don’t, you could try customizing your donation form to include it.
Step Six: Update Your Donation Form’s Confirmation Page and Receipt
Humans are hardwired to give. Our brains release dopamine—the same feel-good chemical associated with eating chocolate or being in love—when we support a cause we care about.
Taking the time to update your confirmation page and receipt can extend the warm fuzzies associated with giving and set the stage for ongoing interaction with your nonprofit.
When you’re customizing your donation form, make sure you customize the confirmation page people will see after they submit their gift.
Your online fundraising platform will almost certainly include a default thank-you message. Replace that language with something more personable! Celebrate your donors’ kindness and generosity, tell them what their gift will help achieve, and let them know you’ll be in touch.
This is also where you’ll bring back your navigation items and sidebar content—and it’s where you can add additional calls to action, too. You could also give donors a next step, like watching a video, following you on social media, or looking at volunteer opportunities.
The same feel-good messaging you include on your confirmation page should be repeated in your receipt! Spending a few minutes updating your nonprofit’s receipts (and your other thank-you messaging) will make a positive impression on your donors and make them more likely to support you again in the future.
Step Seven: Add Your Donation Form to Your Site Navigation
Your donation form is not an “if we build it, they will come” asset. People who land on your website should easily be able to locate a “Donate” button, click on it, and make their gift.
The easiest way to do this is to make your button stand out: Try using a complementary (but contrasting) color in your site navigation. Say your organization’s brand colors are green, yellow, and gray. If your site navigation is green, you could make your button stand out by making it yellow.
Your “Donate” button should take users directly to your donation form—it should only take one click! Giving to your cause should never feel like work, and you don’t want potential donors to spend time searching around your site looking for your donation form. You can add another page that lists other ways to give, but your “Donate” button should always take people right to your form.
Once you have a standard donation page set up and linked on your website, try creating unique donation pages and forms for other campaigns or programs, like:
- A form that defaults to recurring donations to use when you’re specifically asking for recurring gifts
- Forms with different suggested donation amounts to use when you’re sending appeals to different segments of donors. For example, you might create a donation form with higher suggested donation amounts that you’ll use if you’re sending appeals to mid-level or major donors.
- Forms for special fundraising activities like capital campaigns or time-based fundraising challenges
When you’re building or updating your nonprofit website, prioritize making your donation form easy to find. Your donors will thank you!

Build an Effective Donation Form Using Neon CRM
Neon CRM makes it easy to build beautiful donation forms. Whether you choose to use one of our templates or build one from scratch, you can quickly design your donation form, add images and impact statements, and create suggested donation amounts. And, since Neon CRM includes a PCI Compliance program, your donors’ giving experience will be enjoyable and safe.
Want to see it in real life? Take this tour of our donation form builder! It’s a great way to get a feel for how you can build a beautiful form for your organization.